EMR-PM Property Management Version 2.0November 2013
Thank you for purchasing EMR-PM Property Management.
If you have any questions that are beyond the scope of this help file, please do not hesitate to email me via our Site.
I am always happy to help if you have any questions relating to EMR-PM.
For the latest version of this document, please visit the Online Version.
Easy to get started, everything you need to grow your Rental Property Business. EMR-PM is simple and fun to use - just log in, and start adding in your Properties and Tenants.
E. General EMR-PM Usage top
I am not going to go into great detail with this help file, just run down some of the options you will use most often.
Most operations are self-explanatory.
If you run into trouble anywhere while using EMR-PM, please do not hesitate to contact me through our Corporate Site.
1. The Admin Dashboard
After logging in for the first time, you will be taken to the Admin Dashboard.
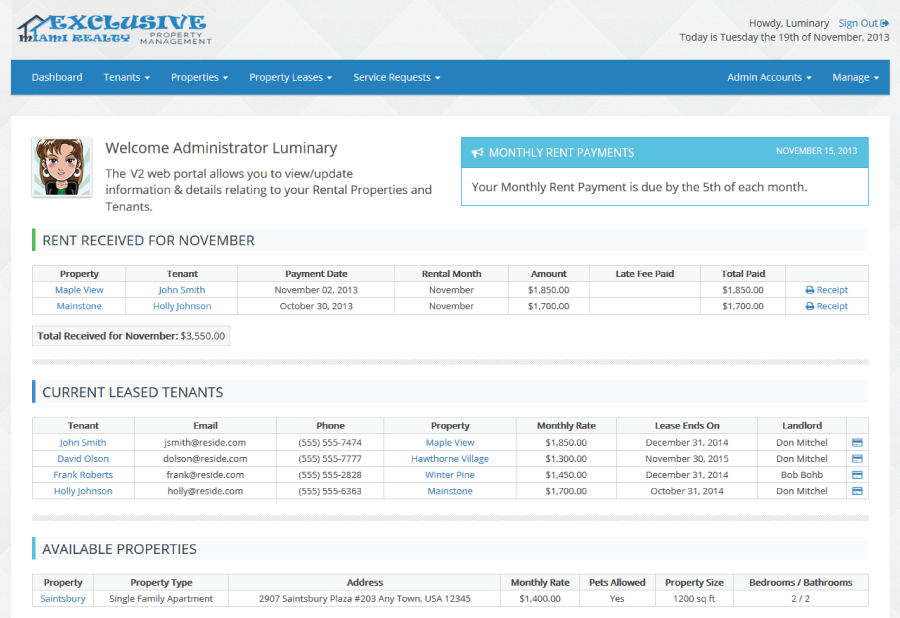
From here you have access to everything you need to help you manage your rental Properties.
2. Site Alerts
Site Alerts are a great way to communicate small bits of information to all of your Tenants.
Click on the Site Alerts link in the Manage dropdown menu to start creating new Alerts.
Click on the "Add a New Site Alert" button to get started.
Set a Site Alert as "Active" to display it on the Dashboard.
You can give a Site Alert a Start Date and an Expiration date. This will cause the site alert to become active, and go inactive on those dates respectively, and will no longer be displayed to Tenants.
If you do use the Start Date and an Expiration date options, be sure to set the Alert as Inactive. Any Alert set as Active will ALWAYS be displayed to Tenants.
3. Site Settings
Site settings was covered in detail on the Installation guide.
4. Forms & Templates
I added this to help manage/store any forms or templates you use on a regular basis. Forms & Templates are Admin side ONLY, and Tenants do not have access.
This is a great way to store your blank forms like Leases, Check-In sheets and other blank templates.
Forms & Templates work just like Tenant Uploads, saving any uploaded documents in the admin/templates folder.
Pre-Made Forms
EMR-PM comes with a few pre-made Forms & Templates. These are great to use with your Tenants. These pre-made forms are designed to be filled out, printed and then given to the Tenant.
If you have the full version of Adobe Acrobat, you can also save the completed form, and then
upload it to the Tenant's account.
5. Tenants
You can start adding your Tenants from the "Add a New Tenant" link in the Tenants dropdown menu.
You can have an email automatically sent notifying the Tenant of their new account. The email is sent to the Tenant's email address you type in on the form.
Once a Tenant has been added, you can edit the Tenant's account as needed.
6. Properties
You can start adding your Properties at any time.
Adding a new Property is pretty simple, just follow the the form. Once you have added a property, you can then update and add additional information to that property.
7. Leases
You can create New Leases for any of your available Properties.
Please note: This is a multi step process.
Step 1: Create New property or visit existing property.
Step 2: Select Lease on property listing.
Step 3: Assign the New Lease to an available Tenant or create new tenant.
Each step will be displayed in turn, after the previous step has been successfully completed.
8. Receiving Payments
Any payments for Fees/Rent you receive will need to be entered. No worries, I made it as painless as possible.
When you receive a Payment (either in person, mail or by PayPal), navigate to that Tenant's Property and then click on the "Record a Payment Received" button in the sidebar.
Fill in the form and you are set.
Receipts are generated automatically, and both the Tenant and any Admin can view/print them.
9. Refunds
You can issue a Refund for a Payment received.
This is useful to refund Security Deposits after Tenants Move Out or for overpayments etc.
Again, navigate to that Tenant's Property and then click on the "View All Lease Payments" button in the sidebar. Click on the Payment from which you want to issue a refund and finally
click on the "Issue a Refund" button. Fill in the form and you are set.
10. Service Requests
Tenants can Request Service Calls through their account.
New/Open/In Progress Service Requests are displayed on the dashboard for both the Tenant & the Admins.
I added in the ability for an Admin to add a Service Request for a Tenant in cases when the Tenant calls in the Service Request instead of using EMR-PM.
Again, Thank You
I again want to say a BIG Thank You to all of my buyers for your ideas, suggestions and support.
You guys are just Awesome. =)
Enjoy!